JSF 2.0 Templating

In this small tutorial we’ll create a simple JSF template.
Pre-Requests:
- NetBeans
- Glassfish (4.x)
- JSF (2.x)
- Maven (3.x)
Table of contents:
- Creating and Configuring the Project
- Creating the Basic Template
1- Creating and Configuring the Project
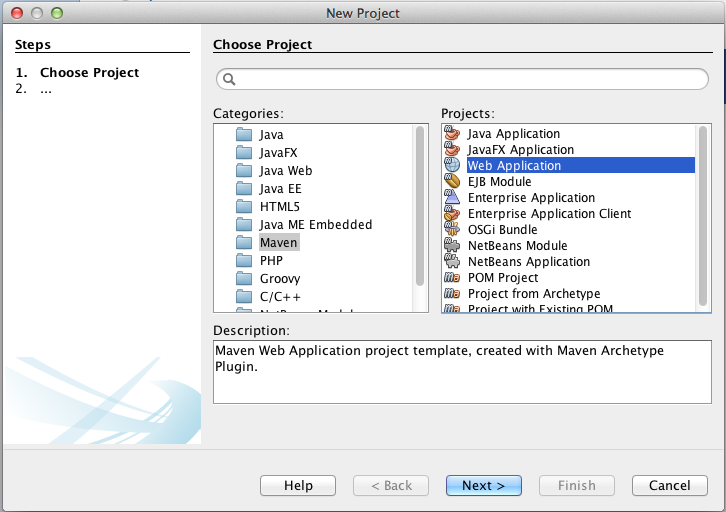
Open NetBeans and select New Project > Maven > Web Application
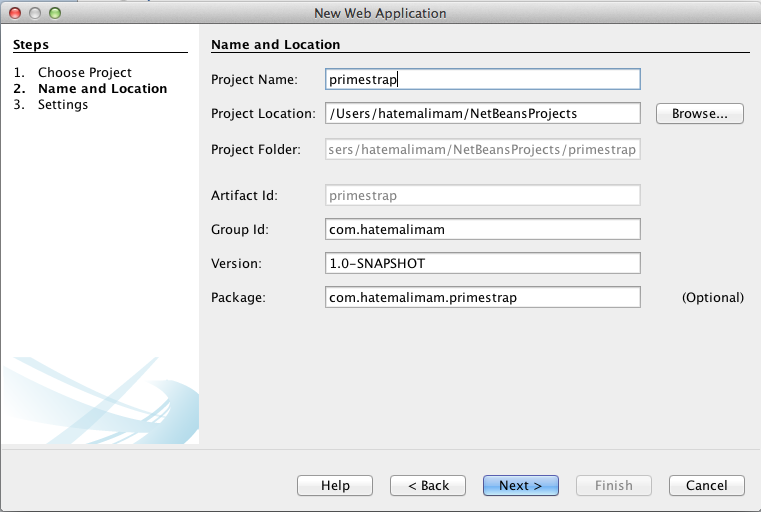
Enter the Project Name and Group Id
Choose your server and Java EE 7 Web
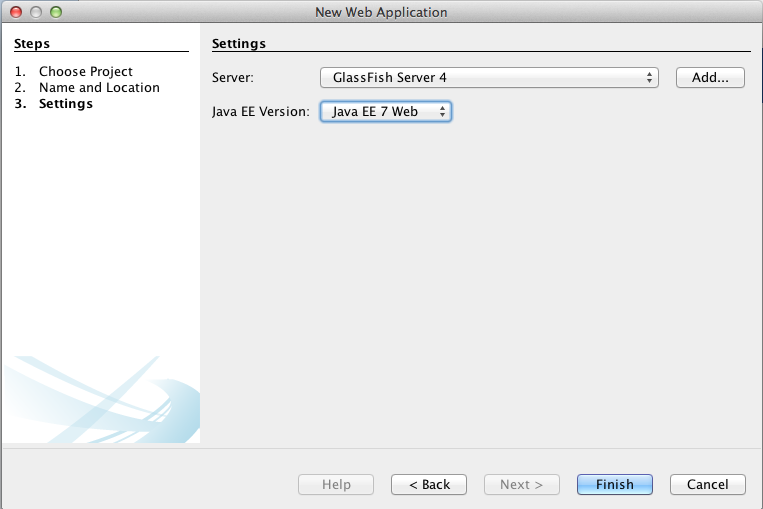
Click Finish.
The project structure should look like this
primestrap
    ├── nb-configuration.xml
    ├── pom.xml
    └── src
        └── main
            ├── java
            │   └── com
            │       └── hatemalimam
            │           └── primestrap
            └── webapp
                └── index.html
Create web.xml

Open web.xml inside WEB-INF and add the following
    <display-name>primestrap</display-name>

    <!-- Change to "Production" when you are ready to deploy -->
    <context-param>
        <param-name>javax.faces.PROJECT_STAGE</param-name>
        <param-value>Development</param-value>
    </context-param>

    <!-- Welcome page -->
    <welcome-file-list>
        <welcome-file>index.xhtml</welcome-file>
    </welcome-file-list>

    <!-- JSF mapping -->
    <servlet>
        <servlet-name>Faces Servlet</servlet-name>
        <servlet-class>javax.faces.webapp.FacesServlet</servlet-class>
        <load-on-startup>1</load-on-startup>
    </servlet>

    <!-- Map these files with JSF -->
    <servlet-mapping>
        <servlet-name>Faces Servlet</servlet-name>
        <url-pattern>*.xhtml</url-pattern>
    </servlet-mapping>
2- Creating the Basic Template
Create a resources folder inside the webapp one with the following folder hierarchy
webapp
    ├── WEB-INF
    │   └── web.xml
    ├── index.html
    └── resources
        ├── css
        ├── images
        └── js
For more info on the resources folder, refer to this article.
Create a templates folder inside webapp , with a subfolder named after the theme name let’s call it default
webapp
    ├── WEB-INF
    │   └── web.xml
    ├── index.html
    ├── resources
    │   ├── css
    │   ├── images
    │   └── js
    └── templates
        └── default
Create main.xhtml file inside the default folder, this file is the main template

Define the main header sections inside main.xhtml
<?xml version="1.0" encoding="UTF-8"?>
<!DOCTYPE html PUBLIC "-//W3C//DTD XHTML 1.0 Transitional//EN"
    "http://www.w3.org/TR/xhtml1/DTD/xhtml1-transitional.dtd">
<html xmlns="http://www.w3.org/1999/xhtml"
      xmlns:h="http://java.sun.com/jsf/html"
      xmlns:f="http://java.sun.com/jsf/core"
      xmlns:ui="http://java.sun.com/jsf/facelets">

    <h:head>
        <f:facet name="first">
            <meta http-equiv="X-UA-Compatible" content="IE=edge" />
            <meta content="text/html; charset=UTF-8" http-equiv="Content-Type" />

            <title>primestrap</title>
        </f:facet>

        <f:facet name="middle">

        </f:facet>

        <f:facet name="last">

        </f:facet>

    </h:head>

    <h:body>
       <ui:insert name="content" />
    </h:body>
</html>
Skeleton Pages
Usually when you have a website, a header a footer and maybe a left/right menu is needed.
In that case you would create different files, header.xhml footer.xhtml , leftMenu.xhtml .
header.xhml
<html xmlns="http://www.w3.org/1999/xhtml"
      xmlns:ui="http://java.sun.com/jsf/facelets">

    <ui:composition>
        <div>
            HEADER
        </div>
    </ui:composition>
</html>
Now you would include it in you main template file
    <h:body>
       <ui:insert name="header">
          <ui:include src="/templates/default/header.xhtml" />
       </ui:insert>
       <ui:insert name="content" />
    </h:body>
Create Welcome page
Create index.xhtml inside webapp and point to our template
<!DOCTYPE html>
<html xmlns="http://www.w3.org/1999/xhtml"
      xmlns:h="http://java.sun.com/jsf/html"
      xmlns:f="http://java.sun.com/jsf/core"
      xmlns:ui="http://java.sun.com/jsf/facelets"
      xmlns:p="http://primefaces.org/ui">

    <ui:composition template="/templates/default/main.xhtml">
        <ui:define name="content">

        </ui:define>
    </ui:composition>

</html>
Where to go from here ?
You need to work more on the layout and how to divide your pages, consider using some cool frameworks like Twitter Bootstrap, here’s how to integrate this template with Twitter Bootstrap
Superb,
short …
straight forward.
excelente great!
Hatemalimam, this is just too great!
Wohw why weren’t my varsity lectures all like this. Thanks buddy
Brilliant, worked like a charm.
Thanks!
Excellent, Thanks!.
In the Submit button action method, retrieve the SQL query input in the JSF input text field and run the SQL query to generate a result set. Column headers are added by creating HtmlOutputText header components and setting the headers on the UIColumn components with the setHeader method.