All posts in JSF

  • Export PrimeFaces Charts to PDF

    PrimeFaces Charts are based on JqPlot Charts which provides an easy way to export the canvas chart into an image.

    In this small tutorial we will export PrimeFaces provided charts to PDF using pdfmake.js.

    Contents

    1. Export Chart into an Image
    2. Including and setting up pdfmake.js
    3. Include Chart image in pdfmake document

    Read more

  • JSF 2.0 Templating

    In this small tutorial we’ll create a simple JSF template.

    Pre-Requests:

    • NetBeans
    • Glassfish (4.x)
    • JSF (2.x)
    • Maven (3.x)

    Table of contents:

    1. Creating and Configuring the Project
    2. Creating the Basic Template

    1- Creating and Configuring the Project

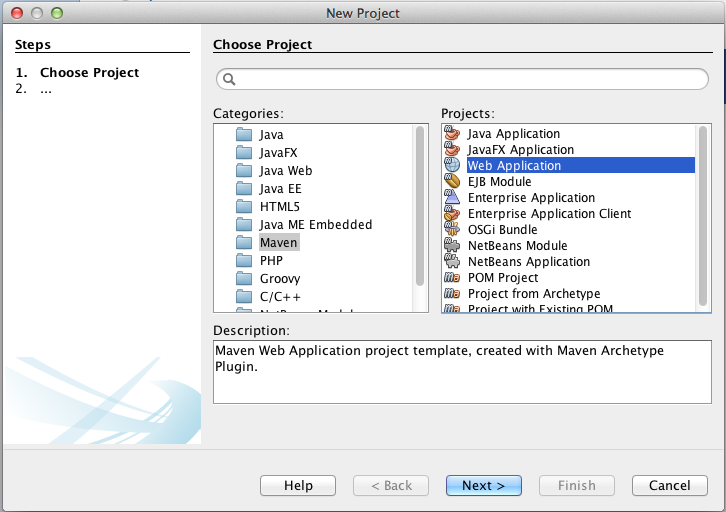
    Open NetBeans and select New Project  > Maven  >  Web Application

    new project > maven > web application

    Read more

  • JSF and Twitter Bootstrap Integration

    Bootstrap is a popular front-end framework for developing responsive websites, and as the mobile devices are taking a good share of the web browsing, it’s important to consider a mobile friendly website (mobile first).

    Starting from PrimeFaces 5.1, PrimeFaces will focus on improving the responsiveness of the components (e.g. p:panelGrid ) depending on the screen size will adjust, so this is a good time to consider adding responsive to your projects.

    In this tutorial you’ll need:

    • NetBeans
    • Maven (3.x)
    • JSF (2.x)
    • Bootstrap (3.x)
    • font-awesome (4.x)

    Table of contents:

    1. Include Bootstrap into a Template
    2. Implementing Dashboard Template
    3. Adding font-awesome

    You may skip the first step if you have already created the project


    Read more

  • Get widgetVar by Id

    I have many cases in my apps where I needed to get the widgetVar object in Javascript by the component Id.
    I have made this helpful function in order to achieve that goal .

    function getWidgetVarById(id) {
        for (var propertyName in PrimeFaces.widgets) {
          if (PrimeFaces.widgets[propertyName].id === id) {
            return PrimeFaces.widgets[propertyName];
          }
        }
    }

    Usage

    getWidgetVarById('form:dialogId');

    This will return the object, in the previous case a dialog widgetVar object is returned, to show it simply call show()  right away.

    getWidgetVarById('form:dialogId').show();

    – Conclusion

    All the widgetVars are stored in the PrimeFaces.widgets. namespace.
    Iterating over that namespace and comparing the given Id with the object’s is the way to find your widgetVar.

    Note: this equals to the expression  #{p:widgetVar(‘form:dialogId’)}  (Server-side evaluation)


  • Intro To PrimeFaces widgetVar

    In these series of PrimeFaceswidgetVar , I will focus of the detailed use of the javascript API provided by PrimeFaces.

    Diving into the API needs too much debugging since most of it is not provided in the official documentation.

    The basics of debugging and knowing what to call and what this function would do is very simple and hard in the same time, since it would require some knowledge in Javascript and jQuery.

    In Google Chrome the console would provide a very helpful and powerful access to everything you need to know about this API, and without it I would tell, your application wouldn’t reach production level if you are building a real world website/application.

    Contents:

    1. What is a widgetVar ?
    2. What the objects are made of ?
    3. What to expect from this API ?
    4. How to debug ?

    PreRequests: a general understating of javascript and jQuery.

    Read more

  • Primefaces Hash Navigation Using jQuery BBQ

    With jQuery BBQ you can keep track of state, history and allow bookmarking (#hashtag) while dynamically modifying the page via AJAX and/or DHTML.. just click the links, use your browser’s back and next buttons, reload the page, it’s all there.

    Integrating jQuery BBQ with JSF/Primefaces is pretty much straight forward.

    Before make sure that you have these points:

    • Create your JSF Project
    • Download jQuery BBQ (here)
    • Include jQuery BBQ  into your resources js folder

    I’m going to use Primefaces extensions for the predefined layout’s  sake (You can have your own menu and centered content layout).

    Now the scenario is very simple, we have a master menu with links to our pages (outcome), we click a link the page doesn’t reload but reloads only the content of the centered container, and we have to make sure that this is bookmark-able and would work with the browser’s back and next buttons, and even if we reload the page .

    Read more

  • Create JSF 2.1, Primefaces 4.0, EJB, Restful Project, Using Maven, with JBoss AS 7, Postgres DB and Eclipse.

    In this step by step “tutorial”, I will try to demonstrate how to create a new JSF 2.1 Project and add Primefaces 4.0 to it, alongside with EJB, JPA, REST.

    I will use in this “tutorial”:

    used-toolkit

    and Ubuntu as OS.

    Contents:

    • Create Project Using Maven. (1)
    • Import and configure Eclipse Project. (2)
    • Add Primefaces.(3)

    Read more

  • Primefaces: AutoComplete suggestions panel position fix

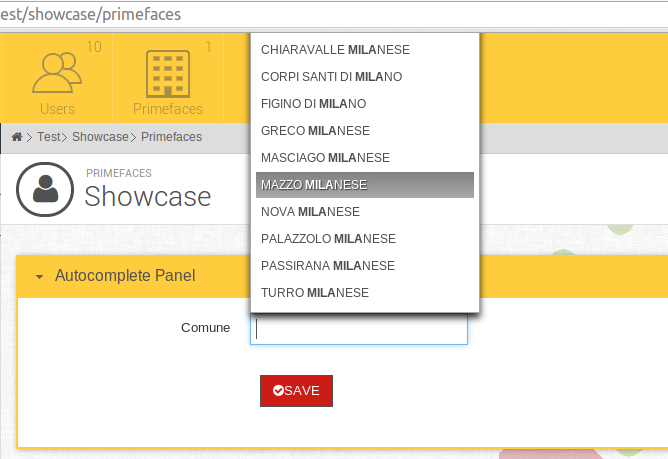
    Somehow primefaces suggestions panel position detection is always top, and this sometimes causing an inability for the user to choose from the list, especially if it’s too long and not limited by results.

    primefaces wrong autocomplete panel position

    As you can see some of the suggestions are invisible.

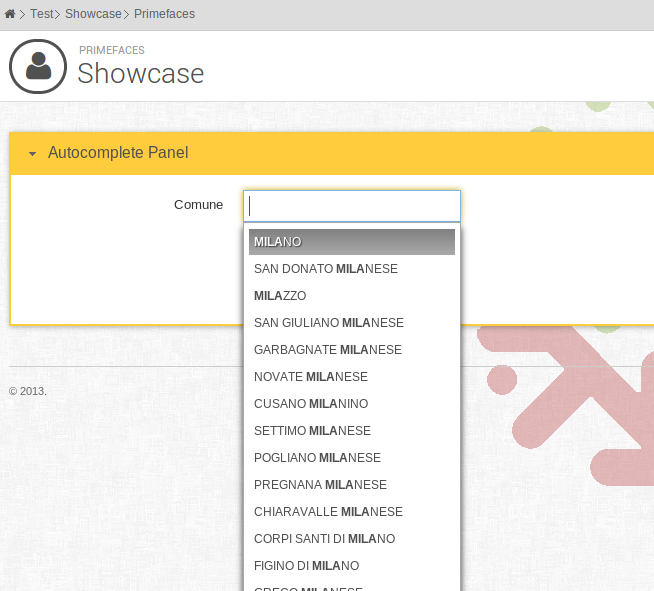
    I managed to solve this issue by overriding the alignPanel “CSS” of the autocomplete widget.

    PrimeFaces.widget.AutoComplete.prototype.alignPanel = function() {
            var fixedPosition = this.panel.css('position') == 'fixed',
            win = $(window),
            positionOffset = fixedPosition ? '-' + win.scrollLeft() + ' -' + win.scrollTop() : null,
            panelWidth = null;
    
            if(this.cfg.multiple) {
                panelWidth = this.multiItemContainer.innerWidth() - (this.input.position().left - this.multiItemContainer.position().left);
            }
            else {
                panelWidth = this.input.innerWidth();
            }
    
            this.panel.css({
                            left:'',
                            top:'',
                            width: panelWidth
                    })
                    .position({
                        my: 'left top'
                        ,at: 'left bottom'
                        ,of: this.input
                        ,collision: 'none',
                        offset : positionOffset
                    });
        }

    just put this in the document.ready and the magic happens!

    Or you can donwload the JS File and include it: autocomplete.panel.fix.js


    primeright

  • Primefaces: Close All Lightboxs

    I had a datatable which contains in each row a link to a different iFrame p:lighbox, and on the same page I had to repeat the same datatables with different objects modules and they also have iFrame p:lightbox.

    I came to a place where I had to close the p:lightbox from a backing bean according to some logic validation,
    and in the same time I can’t know the widgetvar of the current opened p:lightbox, so I had to write some generic function to close all the Lightboxes inside the page.

    First I had to know how primefaces generate the widget vars, after some search I found a function in primefaces which takes an ID of a component and generate a proper widgetvar for it.

    #{p:widgetVar('componentId')}
    

    Basically it does the following it gets the id of the component, for example formId:componentId and replaces the : with _ and append a widget_ to the beginning of the var so it becomes widget_formId_componentId.

    So I came with the following function of jQuery to close all my lightboxs in the page

    function closeLightBoxes() {	
    	$('.ui-lightbox').each(function() {
    		var widgetVar = 'widget_' + $(this).attr('id').replace(":", "_").replace('_panel','');		
    		window[widgetVar].hide();
    	});
    }
    

    First I select each .ui-lightbox class, which is the div of the iFrame and then I do the simple formation of primefaces widgetvar generation, but primefaces adds _panel to the end of the ID of that div, so I had to remove it.

    Note: do not specify any widgetvar to your lightboxs, not even dynamic ones.

  • Using Prettyfaces With Primefaces Upload


    <h:form id="upload" enctype="multipart/form-data">           
        <p:fileUpload fileUploadListener="#{fileUploadBean.handleFileUpload}" /> 
    </h:form>

    Well to get this to work smoothly with prettyfaces you must play with the configuration a bit.

    First in order to make sure that the primefaces upload works, you must make sure that you have these:

    • commons-fileupload and commons-io are present in the webapp’s runtime classpath (just dropping the JARs in /WEB-INF/lib ought to be sufficient).
    • The FileUploadFilter is mapped on the exact <servlet-name> of the FacesServlet as is been definied in your web.xml. If you’ve given it a <servlet-name> of for examplefacesServlet, then you need to edit it in the <filter-mapping> example as well.
    • The enctype of the <h:form> needs to be set to multipart/form-data.
    • In simple file upload with mode="simple", ajax must be disabled on any PrimeFaces command buttons/links by ajax="false".

    Now in the web.xml configure the fileupload filter which parses the multipart request. FileUpload filter should map to Faces Servlet:

    <filter>
        <filter-name>PrimeFaces FileUpload Filter</filter-name>
        <filter-class>
            org.primefaces.webapp.filter.FileUploadFilter
        </filter-class>
    </filter>
    
    <filter-mapping>
        <filter-name>PrimeFaces FileUpload Filter</filter-name>
        <servlet-name>Faces Servlet</servlet-name>
        <dispatcher>FORWARD</dispatcher>
    </filter-mapping>
    <!-- Make sure that your servlet-name is the same in primefaces <filter-mapping> -->
    <servlet>
        <servlet-name>Faces Servlet</servlet-name>
        <servlet-class>javax.faces.webapp.FacesServlet</servlet-class>
        <load-on-startup>1</load-on-startup>
    </servlet>
    
    <servlet-mapping>
        <servlet-name>Faces Servlet</servlet-name>
        <url-pattern>/faces/*</url-pattern>
    </servlet-mapping>

    Notice that I didn’t configure any related Prettyfaces servlet filter!
    If you are using a Servlet 3.0 compliant container, PrettyFaces will automatically register the required Servlet Filter; otherwise, make sure PrettyFilter is the first filter in your web.xml file. (The dispatcher elements are required to ensure PrettyFaces intercepts both internal and external requests.)

    The trick in the config is the dispatcher inside filter-mapping of the primefaces upload filter

    <dispatcher>FORWARD</dispatcher>

    That’s it, you should now be able to upload with Prettyfaces URLs.

    Case built with:
    Primefaces 3.5
    prettyfaces 2.0.4
    commons-io 2.4
    commons-fileupload 1.3

    A helpful stackoverflow post